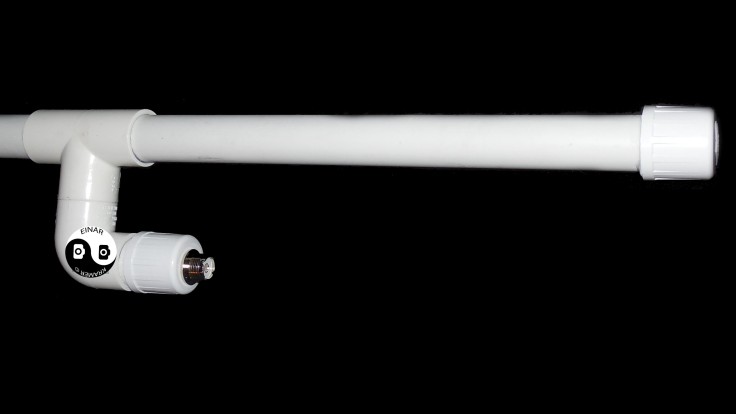
My base antenna is an original DBJ-1 antenna made by Doctor Ed Fong himself or one of his students. This antenna does not need a ground plane nor ground plane radials.
The black tape for waterproofing. It is now hung a tad higher than in this picture.
I assembled it slightly differently than most, by having the plug on a “branched” piece of pipe instead of on the bottom. This, so the plug wouldn’t conflict with the fastening method. The segment of pipe below the antenna inside of it is reinforced with an extra piece of (smaller diameter) pipe.
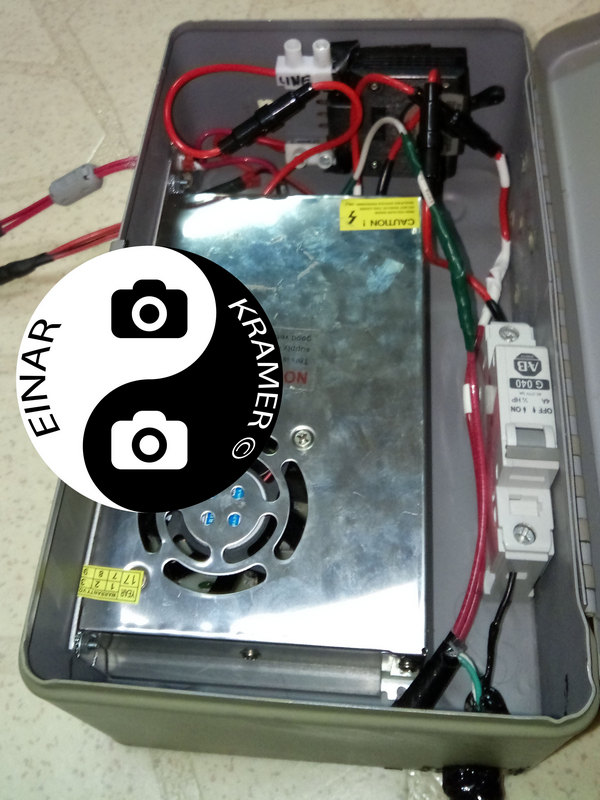
I’ve finished putting together my power supply for the radio. I initially had it in a plastic food container but planned on putting it in a pretty, old Christmas cookie tin from Norway, but then I found this pretty cash-box at Goodwill that was so perfect for this project. The white circuit breaker is for AC (5A 240VAC) and black for DC (20A 80VDC). Both are used or “new old stock” from ebay. I got the very large terminal blocks I used on the DC circuit breaker from Einar Tunby, a relative overseas. Both circuit breakers are fastened with “Extreme hold” double-stick tape. So here it is. Version 2.0:
I found out that touching a 100 Watt soldering iron with your bare hands is a bad idea. Luckily, I had a single Hydrocodon pill left over from a back injury a few years back.
I installed extra fuses on both AC and DC, tooth washer for improved conductivity/grounding inside and outside and extra ferrite cores for noise reduction. These improvements are made after suggestions from members in the facebook group Useful Amateur Radio Projects.
Home depot didn’t have rubber grommets small enough for my needs, so I taped the cables where they go through the case, put electrical ties and smeared with Shoe Goo on both sides. The result seem pretty solid.
It looked pretty sleek inside until I added three additional fuses for safety, making it version 2.1, messy, but even safer. I’m using it with the lid open until a fan I ordered arrives.
Finally powered up my stationary radios!! Not sure if the tiny amount of noise on AM CB is caused by the power supply, so I might add some filtering capacitors.
I was going to put in one or two small (40mm) PC fans into this, but after some thinking, changed my mind and cemented in a large PC fan with spacers (coke bottle caps). This should both help air escape (it’s somewhat under the ventilation holes in the lid) and also spread heat from the PSU itself to the case, hopefully making the case act as a large heatsink.
I glued a voltmeter to the fan, too. Makes voltage adjustments very convenient.
Finally got a decent power supply (12V 20A). I wanted to block my pets from sniffing/licking a live 120VAC wire, so I decided to put it in a container. How much air does this thing need? Have holes all along the side of the box, all over the lid and extra holes above the fan. Hope this will be enough air flow.
To ensure that the prongs of the back of the volt meter didn’t short on the metal case of the PSU, I put two layers of electrical tape on the back of before duct taping it. I might JB weld it to the body unless JB weld is conductive(?). If so, ShoeGoo might be an alternative.
Also, for safety, I later taped the mains cable with several thin strands of duct tape inside of the container so the live wire wouldn’t accidentally be pulled out and be exposed or short.
Need to stack one radio on top of the other without buying extra, expensive brackets?
Here’s how I put my used RadioShack brand CB on top of my Kenwood TM-281A VHF!
I used two 1-13/16 in. x 5 in. Tie Plates ($0.52 each at Home Depot) that I bent as seen in the last picture. I also enlarged the hole where the CB mounting screws go (used the drill on my Leatherman SuperTool) and filed notches in the tie plates where the screws for the Kenwood goes through.
I painted the things with PlastiKote Bed Liner spray.
The screws shown inserted in the side of the CB radio are not the right dimension and has since been replaced with better fitting screws. I used rubber O-rings in between, to reduse vibration.
So I tried bending this piece of a discarded piece of steel (what is this thing, by the way?) into a CB mounting bracket, but as you can see, it broke. Think the strap in the link can be bent with a hammer?
Bottom three images in collage by manufacturers/retailers (Fair Use) http://www.homedepot.com/p/Simpson-Strong-Tie-1-13-16-in-x-5-in-Tie-Plate-TP15/100375260
It’s the new Kenwood VHF and a used CB radio I got on eBay. For safety, I later engraved both radios with my name, email and call-sign in several locations with my engraver (https://www.amazon.com/gp/product/B003I16U8E).
For some reason, the CB interferes with the VHF when it’s set on channel 2. Strange. I have ferrite beads on the power leads on both radios.
The VHF is connected with the original cables directly to the battery.
The CB is connected to the fuse-box using a mystery fuse. I assume it used to be the cable for a tracking device from back when the car still had payments left on it. It lead up to under the dashboard where it was snipped off without any termination or even electrical tape. This is the cable going up to the dashboard. The soldered joints were taped over:
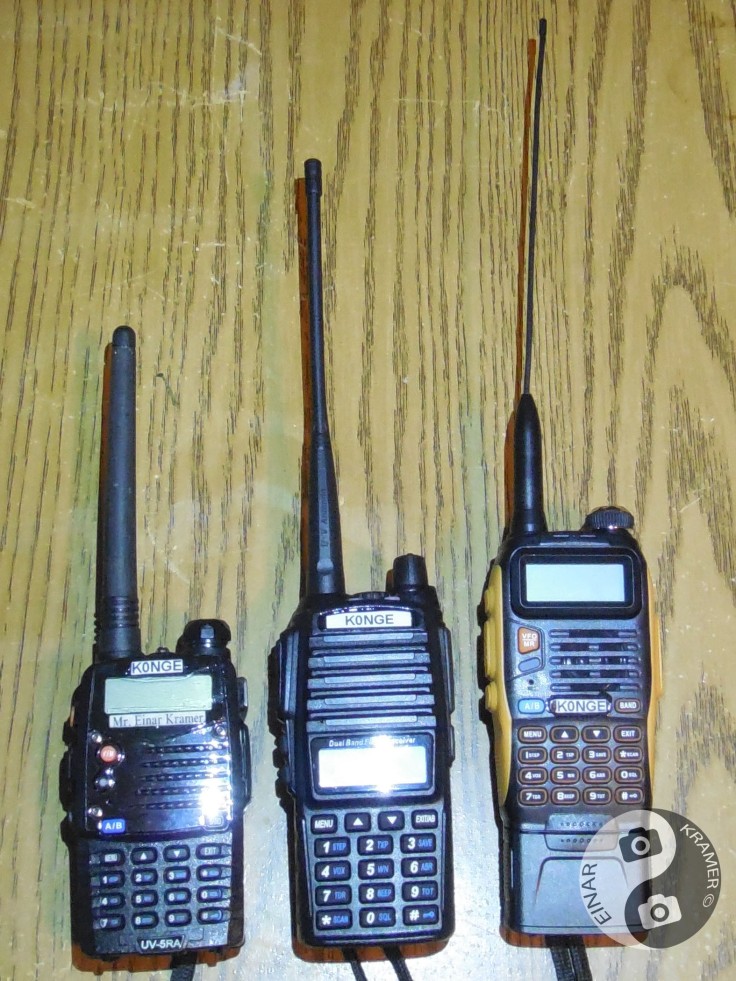
I also have some Chinese dual band handy talkies (Baofeng UV82, UV-5R and GT3-TP) and two CB radios: A used mobile RadioShack (see furter down) and a factory renovated Midland handheld.
My base 25 watt dual band radio and some of my handhelds.
I’ll program your Baofeng/Pofung hand-held (like the UV-5R) or Leixen VV898/VV898S radios for you: baofeng.kramer.ga
Since many people struggle with programming repeaters on their Baofeng, I have started offering programming and I have had a few happy customers already!
I decided yo put my call-sign on my radios, so I asked my wife to print me a few labels with my call-sign on them. I have put them on all three radios and both of the phones I have installed the echo-link android-app.
The UV-82 was especially pleasant to put a label on, since I peeled off the Baofeng face-plate and put my (cut to shape) call-sign label into that recessed area.
It is my experience than labels on often handled objects fall off or wear out fast, so I sealed them on to my radios using some clear nail-polish that my wife had discarded because of the foul smell it gives off while hardening.


")


")


 and some old ones")


Recent Comments